
"... and no one shall work for money, and no one shall work for fame; But each for the joy of the working, and each, in his separate star, shall draw the thing as he sees it, for the god of things as they are"
-Kipling
-Kipling
Updated Page ->HowToConnectPocketBeagleToTheInternetViaUSB.php.
This page describes how to connect your Beaglebone Black to the Internet using the USB cable connected to a Windows PC. Also discussed is some basic "get started" type information including how to connect to the Linux shell on the Beaglebone Black. It is one of a series of (hopefully) helpful Beaglebone Black notes - more of which can be found on the BeagleNotes page. If you wish to connect the Beaglebone Black to the Internet via the built-in ethernet adaptor you may find the Networking Setup Connecting The Beaglebone Black page to be more useful.
You can also find a very good tutorial on this topic at Derek Molloys site http://derekmolloy.ie/beaglebone/getting-started-usb-network-adapter-on-the-beaglebone/
It is recommended that you upgrade your Beaglebone Black to the latest operating system release. Your Beaglebone Black arrived with a Linux operating system already installed on it - probably this is Debian 3.8 if you are using the Rev C board. The latest release will have a number of improvements but, in my opinion, the primary benefit is that it installs on a micro SD card (8GB or bigger) rather than working from the internal EMMC memory as the default version does.
Booting off a micro SD card has a number of advantages - the primary one being that if you make a change and the Beaglebone Black refuses to boot you can just boot off the original default installation (it does not get removed when you boot from the SD card), mount the SD card into the original filesystem and fix up or undo whatever changes you might have made. The alternative, if one messes up an EMMC based installation, is to reformat the EMMC memory from scratch and go back to square one. You can also keep multiple SD cards handy if you are trying different things and there are occasions where you might wish to disable the EMMC memory in order to enable various gpios and other OCP devices which share the same internal resources.
In short, an SD card installation is just as fast and, due to its increased recoverability, it is a lot more usable as a development platform. Later, when you have everything sorted out the way you wish, you can just flash the EMMC memory from the contents of the SD card and carry on from there.
All of the examples below were taken using the 2015-03-01 Debian Distribution found on the Beaglebone Black latest distributions page http://beagleboard.org/latest-images. You can find the installation instructions in the "Update board with latest software" section of the Beaglebone Black Get Started page.
Once you unpack your new Beaglebone Black, plug in the USB cable and follow the instructions on this page: http://beagleboard.org/getting-started. Note that Step 2 is really important – make sure you install the correct drivers on the Windows PC: http://beagleboard.org/getting-started#step2
After completing the steps above you should be able to unplug and replug in the Beaglebone Black and it will appear as a USB drive to windows. The Windows Autoplay application should prompt you how you want to interact with the USB device. It is probably best to choose the “Open Folder to View Files using Windows Explorer” option. Once you do that you should be able to see a window that looks like the one below...
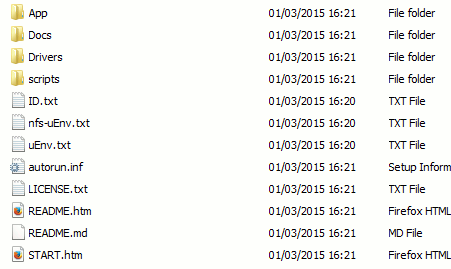
These files are contained in a directory on the Beaglebone Black which appears to the Windows PC as a simple USB stick.
It should be noted that the only reason you can plug your Beaglebone Black in to the PC and see the files it contains is
because it launches special driver software (g_ether) known as the Linux USB Gadget at startup to make this happen. Not all Linux distributions
suitable for the Beaglebone Black do this by default and if you use one of those and need the Beaglebone Black filesystem as USB functionality you may need to configure it yourself.
In case you wish to look for them, or move files back and forth, the directory that contains these files on the Beaglebone Black (in the default distribution) is
/media/BEAGLEBONE or possibly /boot/uboot on some distributions.
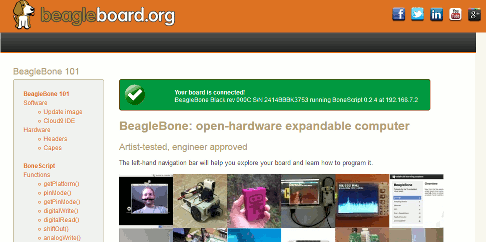
You should now be able to connect to the Beaglebone Black via your web browser. Just start the browser up and enter the address http://192.168.7.2 in
the bar at the top of it. Your browser should display a web page like...
As before, the only reason you can look at a web page on the Beaglebone Black via a USB connection is because the Beaglebone Black operating system has been configured by the developers to start a webserver when it boots. They have also gone to the trouble of making it work via the USB connection. This is done purely to make your introduction to the Beaglebone Black more pleasant and is decidedly non-standard. If you download other Linux distributions for the Beaglebone Black you will probably find that this functionality is missing. In that event you'll probably want to connect to your Beaglebone Black via other methods such as Ethernet. Eventually you are probably going to want to that way anyways - but to get started the USB connection is not all that bad of a method.
At this point you can use bonescript and do some interesting things. However, eventually you are
going to want to login via the Linux shell. Be sure to note down the IP address http://192.168.7.2 – we will need it later on when we connect via SSH.
Your Beaglebone Black is running a Linux operating system – probably a variant of the Debian release - and one of the things you are going to have to get used to in a Linux environment is the extensive use of the command line. Users on a Windows operating system typically start up graphical GUI based tools to perform configuration operations. Linux has these too – however most configuration is done via a command line interface. This is unlikely to change anytime soon and if you are going to do anything serious on the Beaglebone Black you will need to learn how to do this. The interface on Linux which accepts the commands you type is called the shell. It should be noted that the “shell” is not “Linux” itself. The shell is an interface to the Linux kernel and actually there are lots of different types of shell. There will not be much more discussion of the Linux command line or shells here – you can easily find out a lot more information online using web searches like....
linux shell tutorial or linux shell getting started
… and if the idea of a shell or Linux commands is new to you then you really should get yourself some background on the topic before proceeding.
The next step in getting started with your Beaglebone Black should be connect to it via a shell and make sure you can enter commands as the root user. With a USB connected Beaglebone Black there are two ways to do this: using an SSH Client or ignoring the USB connection completely and hooking up a keyboard, mouse and monitor.
 The first way to get a shell prompt on your Beaglebone Black is to connect a keyboard, mouse and monitor and simply restart the Beaglebone Black. You will
need a micro to standard HDMI cable and also possibly a HDMI to VGA converter
(for example a Cable Matters Active Micro HDMI to VGA Male to Female Adapter Model 113048-WHITE)
if you are using an older VGA only monitor. Since the Beaglebone Black has only one
USB host port you'll need a USB port splitter to connect both the Mouse and Keyboard. Note that the USB port you previously connected to the Windows PC is the client port
in which the Beaglebone Black acts as a peripheral to the PC.
In order to connect peripheral devices such as a keyboard and mouse you need to use
the host USB port located at the other end of the Beaglebone Black - the
client and host USB ports are NOT the same! If you connect all that up and start the Beaglebone Black you should see
a graphical user interface on the monitor like the one at left (click on image to see a larger version). This will probably be LXDE and it should be noted that,
unlike on the Windows operating system, there are lots of
window managers available in the Linux world and it could well be something else depending on what the developers decided to make the default. As you might guess, there are
many intense debates (to put it mildly) as to which windowing system is best. Note that on some systems you may have to wait for a while (1-2 minutes) to see the
graphical interface if there is no Internet connectivity to the Beaglebone Black as the boot process stalls while waiting for various things time out.
The first way to get a shell prompt on your Beaglebone Black is to connect a keyboard, mouse and monitor and simply restart the Beaglebone Black. You will
need a micro to standard HDMI cable and also possibly a HDMI to VGA converter
(for example a Cable Matters Active Micro HDMI to VGA Male to Female Adapter Model 113048-WHITE)
if you are using an older VGA only monitor. Since the Beaglebone Black has only one
USB host port you'll need a USB port splitter to connect both the Mouse and Keyboard. Note that the USB port you previously connected to the Windows PC is the client port
in which the Beaglebone Black acts as a peripheral to the PC.
In order to connect peripheral devices such as a keyboard and mouse you need to use
the host USB port located at the other end of the Beaglebone Black - the
client and host USB ports are NOT the same! If you connect all that up and start the Beaglebone Black you should see
a graphical user interface on the monitor like the one at left (click on image to see a larger version). This will probably be LXDE and it should be noted that,
unlike on the Windows operating system, there are lots of
window managers available in the Linux world and it could well be something else depending on what the developers decided to make the default. As you might guess, there are
many intense debates (to put it mildly) as to which windowing system is best. Note that on some systems you may have to wait for a while (1-2 minutes) to see the
graphical interface if there is no Internet connectivity to the Beaglebone Black as the boot process stalls while waiting for various things time out.
 The shell prompt can be started by clicking with the mouse on the LXDE icon in the lower left corner, choosing the accessories menu and
then the LXTerminal application.
The shell prompt can be started by clicking with the mouse on the LXDE icon in the lower left corner, choosing the accessories menu and
then the LXTerminal application.
 A terminal window will pop up as shown in the image at left (click on image to see a larger version).
Essentially you have created a window with a shell prompt using the Beaglebone Black's own LXDE GUI.
Also, it should be noted that it is not necessarily a given that all Beaglebone Black distributions will have a GUI interface. It may never have been configured with a windows manager (called running headless) or the HDMI video may have been disabled because the I/O lines it uses were required for other things. To be honest, the developers of the Beaglebone Black start up a Window Manager by default purely for your benefit (just like the USB filesystem and the webserver) and they all consume resources. If you were using the Beaglebone Black as part of a control system you would probably disable all of these. In that case you would then probably login via an SSH remote telnet connection - this is discussed below.
Note that you may find that when using the keyboard/monitor connection you are not prompted for a password. You should probably enter the command
whoami at the terminal prompt in order to figure out which account you are logged in as. It will probably not
be root – you can change over to the root account by issuing a sudo -s command. If you are unfamiliar with
the sudo command, what it does and why you need to do it then you should probably look that up now.
Connecting using SSH Telnet Client
Telnet is basically a method of presenting a shell prompt from a remote device in a window on a local computer (in this case a Windows PC). Telnet itself is not used much anymore as it is pretty insecure and is disabled by default on nearly all new Linux installations. A similar mechanism called SSH (Secure SHell) is used in its place.
In order to use SSH on Windows you have to have an application that provides it. There are many such software programs – the most common of which is PuTTY. PuTTY is free and can be found on the website below
http://www.chiark.greenend.org.uk/~sgtatham/putty/
I'll not tell you how to install and configure PuTTY here – you can easily find out a lot of information on how to do that on the Internet. Once you get
PuTTY installed and started you can connect to the IP address of the Beaglebone Black (192.168.7.2) using the main configuration panel (left image below).
Once connected, you should see a window like the one on the right side below


Don't be alarmed if the information you see on the screen is slightly different than that shown above. Each variant and distribution of Linux will probably look a bit different. They all operate mostly the same though – at least when you are at the novice level.
When you first connect to the Beaglebone Black the username will probably either be root (with a password of root) or
debian and the password will probably be temppwd or debian. Lots of times the default login information is given to you on the
page from which you downloaded the source image. In the above example, it also helpfully tells you the default username and password in the login banner right on
the screen. You should always change the password by using the passwd command (just type passwd at the prompt). You should also change
the root password from its defaults with a command like sudo passwd root.
Then next thing you will probably want to do is connect the Beaglebone Black to the Internet. Strictly speaking this is not necessary but, in reality, in order to do anything useful with the Beaglebone Black you will probably need to download additional software (or upgrades). In order to save on download size the standard Beaglebone Black distributions ship with a pretty bare bones collection of software and you are expected to download and install anything else you might wish to have.
The first thing you need to know is the IP address of the Beaglebone Black. This is 192.168.7.2. It is the value you put into the browser or PuTTY in order to connect to it.
At the Beaglebone Black shell prompt (PuTTY window or LXDE Terminal) type the command
ping 192.168.7.2
you will see the response below (hit Ctrl-C to stop it)
64 bytes from 192.168.7.2: icmp_req=1 ttl=64 time=0.385 ms

64 bytes from 192.168.7.2: icmp_req=2 ttl=64 time=0.201 ms

64 bytes from 192.168.7.2: icmp_req=3 ttl=64 time=0.211 ms
The ping command is bouncing a test packet off the Beaglebone Black's own TCP/IP port to see if it can find it. If you do not know what the ping command does
you should probably look it up now as it is fundamental to the debugging of any TCP/IP connection. The corresponding port on the other side of the USB connection has the
address 192.168.7.1 but a command like
ping 192.168.7.1
probably will not return any results. It should, but the Windows firewall keeps the PC from responding to pings – even ones connected via a local USB. You could possibly adjust the Windows firewall settings to let the PC respond to pings but you really shouldn't do so as it could open up security holes.
If your Beaglebone Black is connected to the internet you should be able to issue a command like
ping 8.8.8.8
and see a response. The IP address 8.8.8.8 is the google.com main site and it is always online and it will return pings. If your Beaglebone Black is
connected to the internet (most likely it is not by default) you should get a response from it - most likely though you will just get a timeout.
The first thing we need to do is tell the Beaglebone Black how to contact the wide world. We can do this temporarily (you will need to do this each time you reboot the
Beaglebone Black) by issuing a route command (as root). If you are not connected as root you can preface every command with a sudo or use the sudo -s
command once to change into root and save yourself the bother of typing sudo each time. I'll show the usage of the sudo command on the line below but thereafter will not
use it - you can assume a sudo -s command has been previously entered.
sudo /sbin/route add default gw 192.168.7.1
This updates the Beaglebone Black's IP routing table with a default route which tells the Beaglebone Black that any attempt to communicate with an IP address that
it does not know about (i.e. 8.8.8.8) should be forwarded on to the default gateway 192.168.7.1 to handle. This, in a nutshell, is more or less how every
packet on the Internet finds its way to where it needs to go - either the device handling the IP packet knows exactly where to send it or it sends it down a default route to a device that
(hopefully) does know what to do with it.
You have now told the Beaglebone Black what to do with connections to IP addresses it does not know how to handle but you still have to tell the Windows how to route traffic from the Internet to the Beaglebone Black. This is necessary because Windows just doesn't assume that the TCP/IP Packets arriving via the USB port and which are not specifically for it are automatically destined for the Internet (and vice versa). In other words, packets arriving on the Windows box via the USB connection on the PC have no default route.
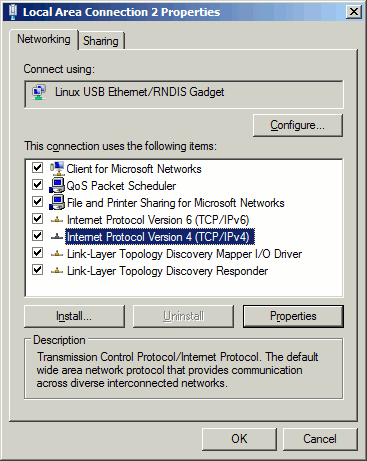
The network configuration is done via the Network Configuration settings in the Windows Control Panel – the examples below are from Windows 7. Open the Control panel and navigate to the Network Connections panel – it is about three layers deep. You will see something that looks like...

Note there are three connections on this panel in this example. Your PC may have fewer but there should be at least two if the Beaglebone Black is connected via USB. In this example the two we are interested in are the ones labeled “Linux USB Ethernet/RNDIS Gadget” and the other one which (on my PC) is labeled BTHub3-WKH3. Either or both of these will likely have different names on your system. Also note the names "Local Area Connection" and "Local Area Connection 2" as we will need these shortly.
The BTHub3-WKH3 is the one which connects the PC to the Internet and the Linux USB Ethernet/RNDIS Gadget connection is the one that connects the PC to the
Beaglebone Black. We have to tell the PC that any information to and from IP address 192.168.7.2 (the Beaglebone Black) should be routed from one connection to the other.
In the Windows environment this is called connection sharing.
Right click on the PC's Internet connection icon (BTHub3-WKH3 in this case) with the mouse and choose the Properties option from the context menu that pops up. A window like the one below will appear - this is how you set all of the properties for that connection.

We need to share this connection with the Beaglebone Black (the Linux USB Ethernet/RNDIS Gadget connection). Click on the Sharing tab at the top and you will see the sharing options appear as shown below...

The Sharing tab offers a drop down combo box which can be used to select the connection you wish to share with. These connections are labeled with the title of the connection rather than the name of the device they connect to. Recall that we previously noted that the Linux USB Ethernet/RNDIS Gadget connection was also labelled Local Area Connection 2. This is the one we wish to select here.

Be sure to enable the "Allow other network users to connect through this computers Internet connection" option as shown below. Once that is done, press OK and close the connection configuration form.

On most Windows systems the configuration of the sharing option above stops and restarts the Beaglebone Black Internet connection. Unfortunately, when it automatically restarts, Windows guesses the setup wrongly and we have to now make a slight configuration change to the Beaglebone Blacks connection as well. As you did above with the PC's main Internet connection, right click with the mouse on the Linux USB Ethernet/RNDIS Gadget connection and bring up the configuration form for that connection. Click with the mouse on the Internet Protocol Version 4 (TCP/IPv4) option - it will highlight in blue as shown below. Once that option has been selected, click on the Properties button located on the lower right hand side of the panel.
A window similar to the one below will pop up. It is the IP address which is now incorrect (in this example 192.168.137.1). You can either enter the correct IP address which will
be 192.168.7.1 (note: not 192.168.7.2 which is the Beaglebone Black side of the connection) or, rather more simply, just enable the "Obtain an IP address automatically" option.

The window below shows the form with the "Obtain an IP address automatically" option enabled. Once that is done choose OK to close the form and your connection should be configured. The Windows PC now knows how to route packets to and from the Beaglebone Black.

At this point you will probably see that the PuTTY connection to the Beaglebone Black has been closed as the USB connection is reset. Just restart PuTTY and connect to
IP address 192.168.7.2 and login as you did previously. If you rebooted the Beaglebone Black remember to re-enter the default route
command as discussed above.
You should now be able to successfully ping computers on the Internet via an IP address. However attempts to ping via a name will still fail
ping 8.8.8.8

64 bytes from 8.8.8.8: icmp_req=1 ttl=50 time=38.7 ms

64 bytes from 8.8.8.8: icmp_req=2 ttl=50 time=38.2 ms
If you power down the Beaglebone Black by unplugging its USB cable, plug it back in (hence rebooting it) and connect via PuTTY and try the ping command again ...
ping 8.8.8.8

Network is unreachable
… you will find that the network is no longer reachable. This is because the
/sbin/route add default gw 192.168.7.1
command you entered earlier did not survive a reboot. Just enter it again and the ping command should work.
Devices on the Internet are rarely referred to by their IP addresses. Usually one specifies a name such as google.com which is then used to look up the IP address which is 8.8.8.8. We will want to ensure such name lookups are operational on the Beaglebone Black. Try the command...
ping google.com
If this command does not work and the corresponding command ping 8.8.8.8 does, it means that the Beaglebone Black does not know of a name server it can use to
translate the names into IP addresses. The thing that translates names into IP addresses is called a nameserver and we might as well use googles public nameservers to
translate names into IP addresses for us. You can,
of course, use your own local nameservers if you wish. Nameservers are set in the /etc/resolv.conf file. To add a few nameservers just edit
the /etc/resolv.conf file (as root) using a command like
nano /etc/resolv.conf
On my system I edited it to look like....
domain localdomain

search localdomain

nameserver 8.8.8.8

nameserver 8.8.4.4
and rebooted. Once I did that (taking care to re-enter the route add default command after the restart) a command like
ping google.com
returned the following
PING google.com (31.55.167.150) 56(84) bytes of data.

64 bytes from 31.55.167.150: icmp_req=1 ttl=57 time=35.8 ms

64 bytes from 31.55.167.150: icmp_req=2 ttl=57 time=31.3 ms

64 bytes from 31.55.167.150: icmp_req=3 ttl=57 time=31.7 ms
At this point your Beaglebone Black should be able to connect to the Internet. However, if you create or edit a file you will notice that the date and time stamp on the file is incorrect. You can adjust this manually - but since your Beaglebone Black is now on the internet you can just use a date/time server to correctly set the date and time for you. Try the following
date

Sun Mar  1 22:14:40 UTC 2015
This has returned the incorrect date. If we issue the command (as root)
/usr/sbin/ntpdate pool.ntp.org

7 May 17:12:00 ntpdate[1182]: step time server 85.10.200.230 offset 5770618.326622 sec
then the date command returns....
date

Thu May  7 17:12:02 UTC 2015
... which is the correct date.
Well that's a bit of a problem for which I do not have a good solution. The nameservers are simple, once the /etc/resolve.conf file has been edited, the changes persist over restarts.
However, the g_ether driver which makes the TCP/IP over USB work seems to take a while to start. This means every attempt I made to place a script in the boot sequence to automatically
implement the two lines....
/sbin/route add default gw 192.168.7.1

/usr/sbin/ntpdate pool.ntp.org
on startup has no effect. I am still working on this...
I must confess that I am not a big fan of connecting the Beaglebone Black to the Internet via its USB cable and usually use the ethernet solution as soon as possible. The Internet over USB method tends to be slow and it seems to be impossible to convince the necessary configuration changes to persist over a reboot on the Beaglebone Black. Such configuration issues do not exist with the ethernet method. Also, the Windows PC sometimes forgets the connection sharing after a reboot and even though it looks right, you sometimes (in my experience), have to undo the connection sharing changes, save them, then share the connection again in order to get it to work.
In addition, using the Beaglebone Black as a USB device to transfer files back and forth to the PC is not really all that satisfactory - it works but the update/refresh time is slow. For example, you might create a folder or edit a file and the changes could take 15 to 30 seconds to be visible on both devices. Not really too useful for serious work. If you wish to do that sort of thing then NFS is a far better solution in my experience.
The contents of this web page are provided "as is" without any warranty of any kind and without any claim to accuracy. Please be aware that the information provided may be out-of-date, incomplete, erroneous or simply unsuitable for your purposes. Any use you make of the information is entirely at your discretion and any consequences of that use are entirely your responsibility. All source code is provided under the terms of the MIT License.
Various internet resources were used to help understand the workings of the Beaglebone Black. Especially useful were Derek Molloys Beaglebone pages. Thank you Derek!.