
"... and no one shall work for money, and no one shall work for fame; But each for the joy of the working, and each, in his separate star, shall draw the thing as he sees it, for the god of things as they are"
-Kipling
-Kipling
I was working on another project (Project Gump) that required a small, cheap, single board computer (SBC) to monitor things and communicate back to a central node. The SBC needed to have at least 12 IO pins configurable as inputs, the ability to run C# (I like to program in C#) and also the capability to transmit the input states via TCP/IP. The Raspberry Pi Zero 2W seemed to be a good fit for these requirements and so one was procured and the configuration process began.
This note was written in order to consolidate the tricky little details about how to set up the Raspberry Pi Zero 2W in Headless Mode. This is the information which I would have liked to have known about when I first tried to get headless operation going. It's not that the information isn't out there - it is - it's just that it is not all consolidated into one place.
Note that a Windows 10 operating system is being used as the configuration host. There is no discussion on this page of how to use Linux or Apple OS's for this purpose.
This page is one of a series of (hopefully) helpful Raspberry Pi notes - more of which can be found on the Raspberry Pi Notes page.
For those that are unfamiliar with the term, running "Headless" means the Raspberry Pi does not have an attached Monitor, Keyboard or Mouse. Interaction with the computer is done by connecting to it from a remote computer and entering commands on the command line. Headless operation is much easier on the memory and CPU requirements since, if they are enabled, the Raspberry Pi has to devote a considerable amount of resources in order to support HDMI access as well as interacting with the mouse and keyboard.
So its faster and, if the Raspberry Pi is to be dedicated to some task, a local keyboard and monitor are simply unnecessary and the ability to connect remotely is much preferred.
However there are issues - not the least of which is "how do you connect to the Pi for the first time and how do you know what IP address to use". Not to worry, it is all quite do-able and all of these issues will be addressed in this note.
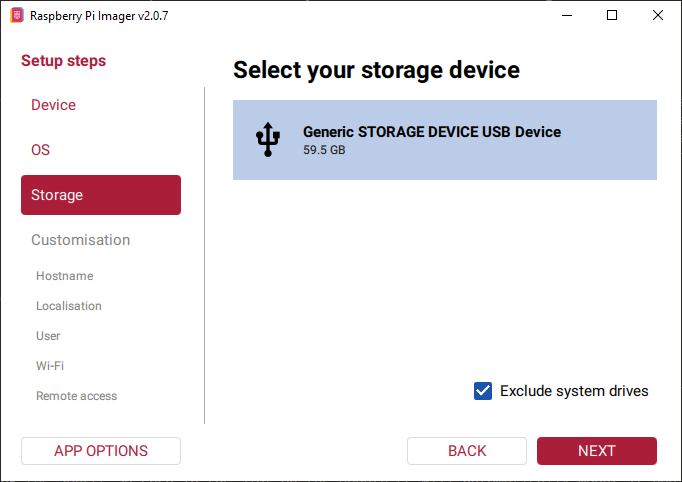
The Raspberry Pi Zero 2 W boots off of a microSD card so you have to have one of those. Most of the RPiZ2W boards you might purchase will not include an SD Card in order to keep the perceived cost down. So watch out for this and make sure you obtain an SD Card from somewhere. I purchased a 64Gb card but a 16Gb card I had laying around also worked just fine.
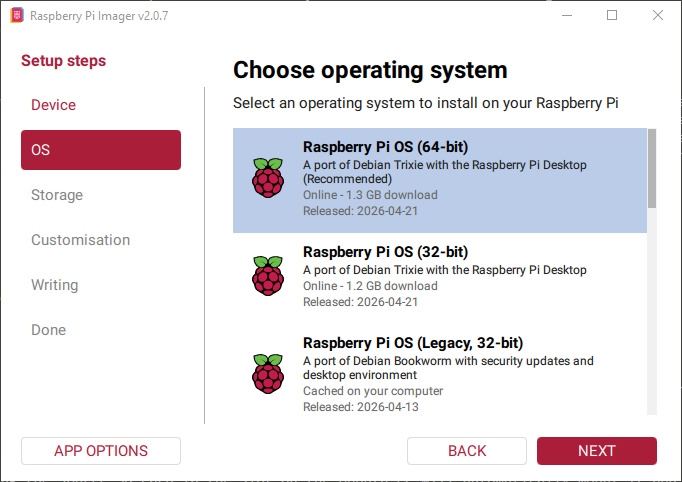
The formatting of this SD Card (rendering it bootable) and the download of the operating system onto it is performed on a Windows, Linux or Apple device. The formatting and download is performed by a free tool called the Raspberry Pi Imager.
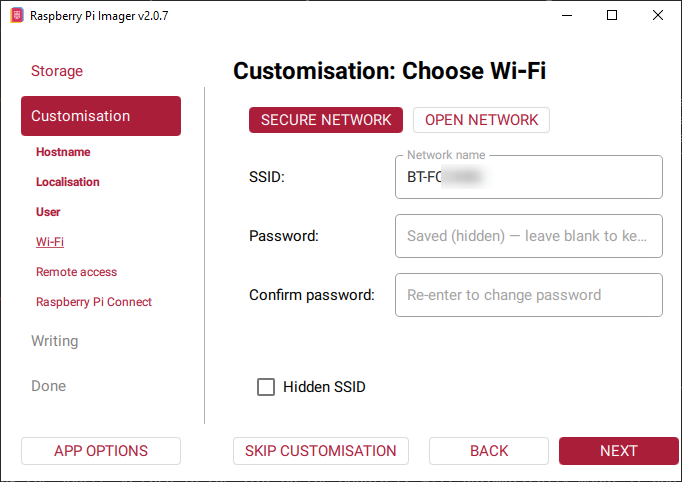
There are two ways to connect to your headless RPiZ2W. The first is via USB and the second is via WiFi. The USB method requires the configuration of some software on the RPiZ2W called an RNDIS gadget which makes the USB port act (as far as the host computer is concerned) as a viable Ethernet route. The WiFi method configures the RPiZ2W to connect to your local area network with an IP address automatically assigned by a something called a DHCP server. Most household routers (the kind of box you probably have in your house to connect to the Internet) are also DHCP servers so you don't have to worry about that. Basically it is the job of the DHCP server to keep track of every IP address it has seen on the network and, when some unknown device requests a new one, provide an IP address known not to be in use. This avoids two devices having the same IP address - IP address collisions are a very bad thing.
I could never get the USB/RNDIS gadget method to work and so none of the information on this page is going to discuss that method. If you have tried configuring this using advice elsewhere and bricked your SD card and are now getting an error in the Raspberry Pi Imager after formatting an SD Card on Windows you can repair it by using the SD Card Formatter from the SD Association.. I know this works because I bricked multiple SD Cards before I figured out how to fix them and that gets expensive.
So lets walk through the process of installing the operating system. This information is widely available and, honestly, the Raspberry Pi Imager software is so simple to use it really doesn't take much describing.
Click on any image to enlarge it.

With the SD Card inserted, plug in the RPiZ2W and wait for a bit. You should see the Yellow LED light up and blink a bit before settling down.

Now we get to the interesting bit. You now have a Raspberry Pi Zero 2 W sitting on your desk. The little yellow light is on and everything looks OK and you are pretty sure that it has connected to your WiFi. But how do you connect to it?
Well, for that we need to know the IP address. However, when devices connect via WiFi they automatically get assigned an IP address (by the DHCP Server) and we do not know what that is and, since our RPiZ2W is headless, we cannot just ask it without connecting first. Kind of a chicken and egg situation.
Fortunately there is some trickery we can use to get the information we need.
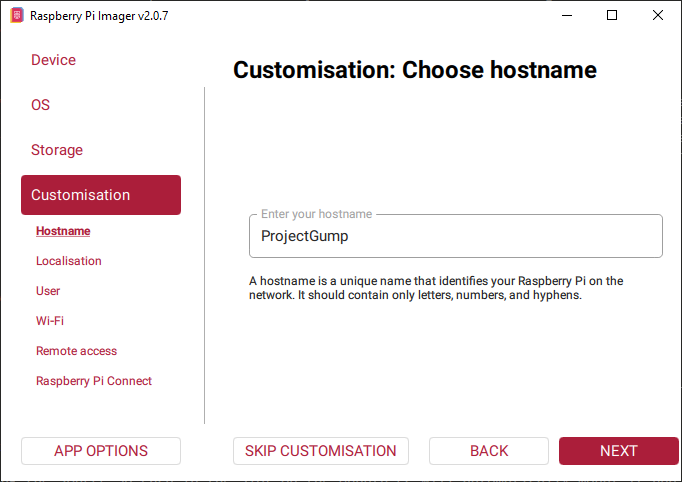
ping <hostname>.local... where <hostname> is the hostname you entered when formatting your SD Card. In my case the command would be: ping ProjectGump.local The ping command will bounce a packet off of the RPiZ2W and the returning information will contain the IP address. You can then use that IP address or the <hostname>.local in the section Connecting to a Headless Raspberry Pi Zero 2 W below. However, if the ping command does not work (and it probably won't) we have to get clever and do a Ping Sweep.
Lets have a look at the current ARP table on your Windows PC. Just start up a Windows Command prompt (press Windows+R key) and issue the command arp -a:
 >arp -a

 Interface: 192.168.1.181 --- 0x11
  Internet Address      Physical Address      Type
  192.168.1.102         1c-ba-8c-a3-33-52     dynamic
  192.168.1.103         00-90-ea-e1-01-fb     dynamic
  192.168.1.254         70-97-41-57-44-8b     dynamic
  192.168.1.255         ff-ff-ff-ff-ff-ff     static
  224.0.0.22            01-00-5e-00-00-16     static
  224.0.0.251           01-00-5e-00-00-fb     static
  224.0.0.252           01-00-5e-00-00-fc     static
  226.1.1.1             01-00-5e-01-01-01     static
  239.255.255.250       01-00-5e-7f-ff-fa     static
  239.255.255.251       01-00-5e-7f-ff-fb     static
  255.255.255.255       ff-ff-ff-ff-ff-ff     static
Yours will be different, of course, but you can look under the Internet Address column to see all local IP addresses that your PC is interacting with. We are only interested in the dynamic ones. None of these devices is likely to be the Raspberry Pi Zero 2 W since the PC will not have connected to it yet and so the IP address of the RPiZ2W will not have been added to the ARP quick reference table.
Note that the first part of these addresses all start with 192.168.1. This value is the local subnet - it likely to be different on your system. Your Raspberry Pi Zero 2 W will be connected on some random address on this subnet.
So, in order to find out the IP address of the RPiZ2W, all we have to do is issue a series of commands like ...
 >ping 192.168.1.1
 >ping 192.168.1.2
 >ping 192.168.1.3
 >ping 192.168.1.4
 ... and so on up to ...
 >ping 192.168.1.254
... and look for a response from something not on the above list. This is likely to be the newly added RPiZ2W. By looking at the response we will then have the IP address and can use it to to set up a connection.
Well, manually pinging 255 IP addresses would be a tedious process. If only there were some way of automating it. By now, I think you know the answer. We will enter a clever DOS shell command which does all of that for us. This is called a Ping Sweep
First, save a copy of the ARP table above by pasting it into a text editor or word processor. This is because successful ping commands will update the ARP table and we will want to compare the before and after versions.
To conduct a Ping Sweep just start up a Windows Command prompt (press Windows+R key) and issue the command:
for /L %i in (1,1,254) do @ping -n 1 -w 100 192.168.1.%i >nulBe sure to change the IP base address (the 192.168.1.%i) in the command to your local subnet.
All this command does is sit in a loop and issue the sequence of ping commands for you. The >nul just removes all of the output text from the returning pings so that your screen does not fill up. You can remove that bit if you would like to see each command execute.
Once the ping sweep finishes, we can have another look at the ARP table. It will be larger since the Windows PC has probably now interacted with every device (phone, tablet, TV set, etc) on the local subnet.
 >arp -a

 Interface: 192.168.1.181 --- 0x11
  Internet Address      Physical Address      Type
  192.168.1.87          d8-9e-f3-96-4d-4f     dynamic
  192.168.1.102         1c-ba-8c-a3-33-52     dynamic
  192.168.1.103         00-90-ea-e1-01-fb     dynamic
  192.168.1.177         1c-ba-8c-a3-33-52     dynamic
  192.168.1.195         00-22-61-84-36-1c     dynamic
  192.168.1.254         70-97-41-57-44-8b     dynamic
  192.168.1.255         ff-ff-ff-ff-ff-ff     static
  224.0.0.22            01-00-5e-00-00-16     static
  224.0.0.251           01-00-5e-00-00-fb     static
  224.0.0.252           01-00-5e-00-00-fc     static
  226.1.1.1             01-00-5e-01-01-01     static
  239.255.255.250       01-00-5e-7f-ff-fa     static
  239.255.255.251       01-00-5e-7f-ff-fb     static
  255.255.255.255       ff-ff-ff-ff-ff-ff     static
If we compare the before and after tables we can see that three new addresses have been added to the ARP table because of our Ping Sweep. These are 192.168.1.87, 192.168.1.177 and 192.168.1.195. In order to figure out which one is our Raspberry Pi Zero 2 W all we have to do is try to connect to each of these in turn.
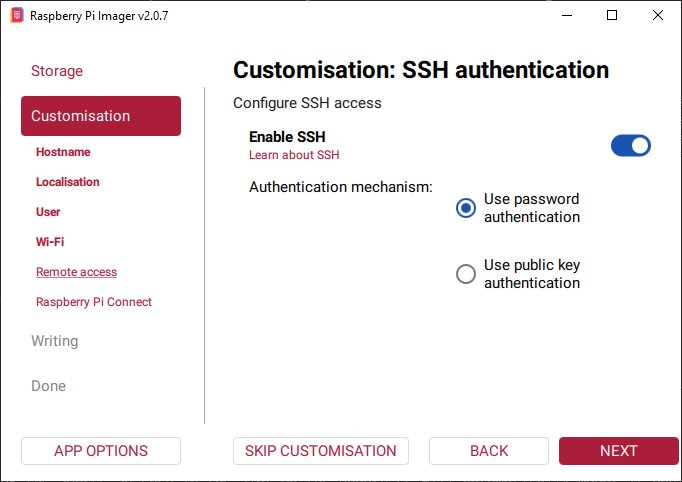
OK, it's not perfect but trying a login on 3 "known to exist" connections is a lot better than trying 250 or so of them. The connection to the Raspberry Pi Zero 2 W is made with an SSH (Secure SHell) program. As you may recall we enabled SSH back in the configuration stage when we created the SD Card.
Well, you have to have an IP address - the discovery of which was the entire point of the previous section. If you arrived here because you clicked a link that lead straight here (or you just prefer to skip down through verbose web pages) and you also do not know the IP address of your target Raspberry Pi Zero 2 W then you should scroll up and read the previous section - it will tell you how to find that.
Assuming you do have an IP address (or a candidate IP address) you need an SSH program. SSH does not come standard with Windows (unlike Linux) and so you will need to download one.
My prefered Windows SSH software is freeware called Putty and a quick Internet search will soon convince you that it is one of the more popular options. The download link for Putty is https://www.chiark.greenend.org.uk/~sgtatham/putty/latest.html. Now I know you are thinking this link looks kinda dodgy but I assure you it is the definitive Putty download link - again, do an Internet search to convince yourself of this if you need to do so.
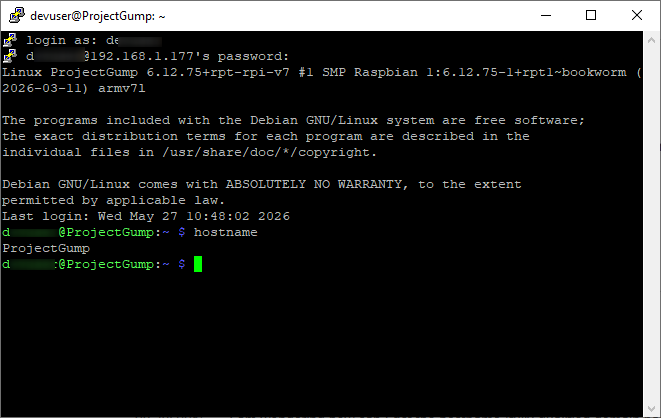
Putty is freeware, it is constantly maintained and I find it works very well. I have never needed any functionality that it does not have. The interface is simple. The image below shows it set up to connect to one of the candidate IP addresses (192.168.1.177) discovered above.
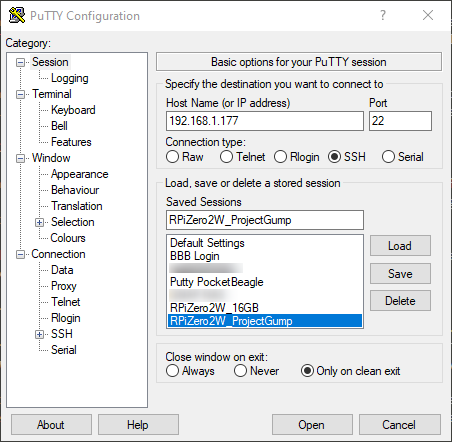
I know this is the Headless Raspberry Pi I am interested in because the login credentials (account/password) that were set during the SD Card configuration process were accepted and I was able to log in. Also a quick hostname command confirmed that the hostname of this computer was ProjectGump - a name which was also configured into the SD Card.
So, now you have configured your Raspberry Pi Zero 2 W and successfully connected to it. Of course, the IP address might change if the RPiZ2W is shutdown and restarted. Probably not though, most DHCP servers are clever enough to try to give the same IP address to each distinct physical device each time they are asked - this makes things consistent. However, if your DHCP server reboots (a power failure perhaps) then all bets are off. The Raspberry Pi Zero 2 W will probably get a new, different, IP address and you will have to discover it again.
In order to avoid having to figure out the IP address of a Headless Raspberry Pi Zero 2 W over and over again you will probably want to inhibit the dynamic IP address acquisition and force it to use a static IP address that you set.
Setting a static IP address on a Raspberry Pi is pretty straightforward - just follow the instructions on this page: Setting a Static IP Address on a Raspberry Pi
The contents of this web page are provided "as is" without any warranty of any kind and without any claim to accuracy. Please be aware that the information provided may be out-of-date, incomplete, erroneous or simply unsuitable for your purposes. Any use you make of the information is entirely at your discretion and any consequences of that use are entirely your responsibility. All source code is provided under the terms of the MIT License.